Any brand or agency delivering projects knows that hitting deadlines is the key to being successful. However, you are bound to run into stumbling blocks once a project kicks off. Has either of these situations happen to you?
You finish your part of the project and send it up the chain for review. The next-in-line stakeholder sends the revisions back with their comments. Fair enough – you’re working in creative teams with various stakeholders; that’s bound to happen. But what when these feedback loops never seem to end, and no one ever gives final signoff.
Or, let’s take another scenario. You’re excited to kick off a project but learn at the 11th hour about taking a final sign off from some other department, which isn’t thrilled with what you’ve done and ask to change the whole thing!
Even if you have never been in such situations, you’re likely to experience them at some point in your professional life. And that’s why you need to establish a creative workflow process.
Creative operations (or Creative Ops) is a process you can set up within your organization to create, review, and approve creative projects. Establishing creative workflow management is a key first step to completing projects more efficiently.
A creative workflow is essentially the process that involves identifying who’s in charge of what deliverables and when. It details the hierarchy and flows from concept to revisions to finalization. The primary reason you need this process is to save yourself a lot of time and headaches from the two scenarios described earlier!
Setting up every process requires a specific set of framework or steps; creative workflows are no exception. Here’s how a typical workflow process looks like with the steps changing from company to company.
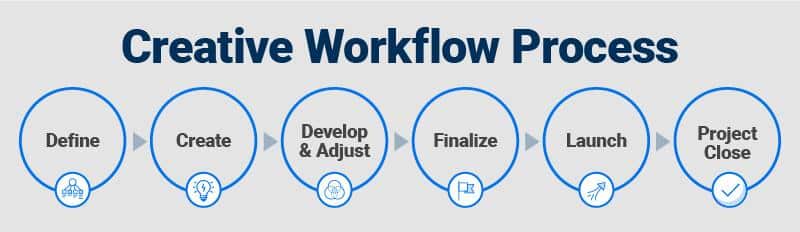
Image source: https://www.smartsheet.com/content/creative-workflow
Here are the key steps to set up a creative workflow management process.
Step 1: Definition or ideation
This first component of a creative workflow is like any other project brief. Here, you need first to define the general idea, who needs the product or solution, and what you need to do to create it. You will lay down a detailed outline of your project’s goal, target audience, budget, deliverables, and timeline.
Here’s an example of what a typical project brief looks like.
Image : https://blog.ganttpro.com/en/creating-a-project-brief-the-starting-point-for-any-project/
These are the tasks you’ll typically undertake in this phase:
It’s essential to add as many pieces of information as possible to your project brief, so everyone can stay on the same page and avoid last-minute confusions.
Step 2: Creation
This phase involves creating the actual product or design. Here’s what you’ll do in this phase:
Step 3: Review and approval
This phase involves getting approval for the product or design that you have created. Here’s what you typically get to see in this phase:
It’s always a good practice to establish an approval process from the outset, so you don’t have to scramble in the end when the product is ready. An important aspect in this phase is to track feedback, so the final product reflects the vision created in the ideation phase.
Step 4: Product Launch
This is the final phase, where you get to see the fruits of your labor! Here, you will:
Following these best practices can help you set up a creative workflow.
Clarify responsibilities
On paper, the responsibilities of everyone look easier. For example:
But in reality, these roles often overlap. Either two people are doing the same work, or each person assumes the other will do it, creating a gap, and leaving team members confused and unclear about their responsibilities. To avoid this, make a clear list of all the responsibilities for each role and communicate them to your team. You must also ensure that they account for every edge case. For instance:
Leverage a project management software
Using project management software can make collaboration and communication easier between your teams. Here’s what this software should have:
Setting review process with clients
You must also ensure that your reviews with your clients are seamless and approvals cause lesser delays. Here are some specific steps you must take:
Workflow automation can be best described as a series of automated actions for the steps in various business processes. When you automate your routine project tasks by using, let’s say, templates – you can improve your everyday processes.
Workflow automation allows your teams to save time and spend it on the processes that support them. It’ll also minimize the likelihood of errors that invariably creep in when a human is involved. There’s an apt quote by Bill Gates on automation:
“The first rule of any technology used in a business is that automation applied to an efficient operation will magnify the efficiency. The second is that automation applied to an inefficient operation will magnify the inefficiency.”
And if you’re unsure about the steps, there are several workflow automation solutions available for creative work management to configure workflows, track revisions, and collaborate in real time. Ask for a free trial before committing, so you can be sure if it meets your specific requirements!
Designing a creative workflow management process is a key step to successful creative project management. It will not just make your business and processes more efficient, accountable, and creative but will also increase revenues. The main point to remember is that you need to keep your workflows and processes clear, simple, and repeatable. This will take any confusion out of a project and leave your team free to do what they do best—be creative.